You are using an out of date browser. It may not display this or other websites correctly.
You should upgrade or use an alternative browser.
You should upgrade or use an alternative browser.
Rib Stitching
- Thread starter lwford
- Start date

Jonathan Baron
New member
Dan:
I was trying to hold my fire regarding the "let's pretend there is a 1200hp Allison or a 1400hp Daimler Benz 605 engine and lots of guns on this wee wooden airplane" nonsense. That's just too OUT THERE for comment. Yeah, you get lots of attention on the ramp. A naked person covered in blue paint would too, even though he might *think* he's living the proud heritage of pre-Christian Celtic warriors.
Not saying that most original Bellanca schemes were bad. Some, though, were. The Bellanca factory of old pretty much followed the Maule model: today we'll use whatever paint Mario found down by the docks for cheap. Some days the paint was bright red or a nice, dark maroon. Some days it was pale teal. When I lived in Washington I'd get asked if I rooted for the Seahawks. The Seahawks were a good time, and even a fine team at times but YOU CAN'T ROOT FOR A TEAM WEARING TEAL UNIFORMS. Sorry, you just can't.
With some airplanes you, thankfully, never had to think about it. Don Luscombe, for example, was primarily a marketing man, his airplanes were aluminum, paint cost money, so he called them Silvairs and shipped them with no paint at all apart from trim and those nice NC numbers on the wings. Yes, this was pretty much a form of punishment for buyers who were left with the choice of flying or polishing so most of them are now painted. And where there's paint there's always the possibility for trouble.
An old guy named Stan would show up to all of our west coast Luscombe fly-ins. I *like* Stan. I hung out with Stan. Stan may walk bent over due to advanced age but he's still a great stick. Always wins the spot landing landing contests and always does so power-off from abeam the numbers. But his airplane's primary color is...yep, teal, with a huge blue bird painted on the side that looks like something that you'd see in crayon on a refrigerator door to keep from hurting the tender feelings of your six year old. I guess lose-your-lunch color schemes are simply one of those elements of General Aviation you have to learn to live with, like self important idiot Feds, high gas prices, and mechanics that are trying to kill you.
With tongue nearly piercing my cheek....
Jonathan
Dan Cullman
New member
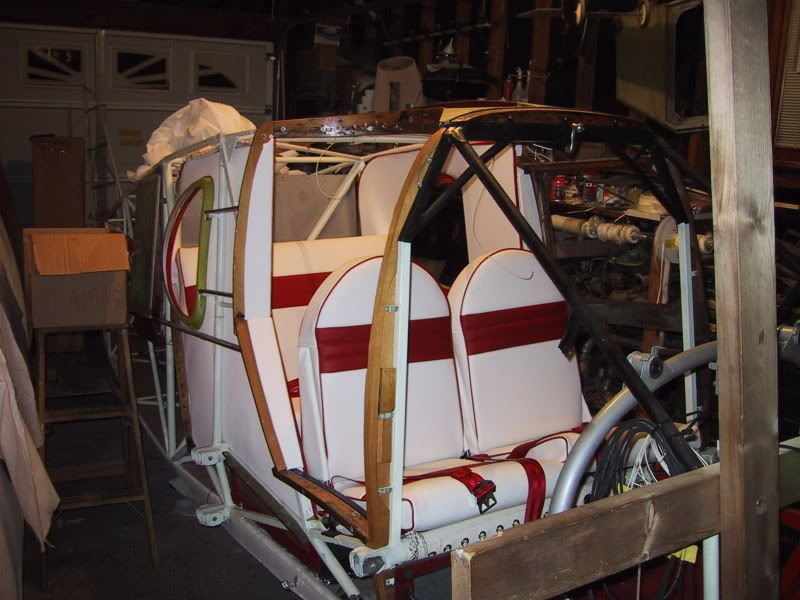
Dave, The paint scheme looks good to me.
mhackens
New member
I can stand for hours looking at a beautiful P-51 with its original stars and bars, especially a polished one. On the other hand I wouldn’t take a second glance at a RV-8 setting beside it with the same scheme. Nor would I pay a great deal of attention to the Mustang if it had the scheme the RV should have used. That is MY preference, I wouldn’t ever ague (maybe try to reason) with a fellow that has been working for 10 years on his aircraft and wants to put big, red poke-a-dots all over it and nose art proclaiming it “DOTTY”. Sometimes I think we may take the term amateur built (or amateur restored) a tad too far, but maybe it’s another way of saying “I did this all myself”.
I personally like DD’s scheme A LOT, but to make it work, again, it has to have the right combination of colors, and I don’t think it would work well with anything past the Cruisair. (yes, Jonathan teal is probably out)
My brothers two C140’s are a good example, one is polished, he worked days getting the trim exactly as it was from the factory. The other he picked up as salvage, medium brown with large yellow and orange trim strips all over it. (I nearly vomited over the pieces) After getting it home we decided it was too intact to part out so we rebuilt it. I took a picture of both of them setting in front of the hangar, last week. Got to admit the brown one is an attention getter, but I still prefer the original.
I went to a large car show with my restore brother this past weekend; the place was ablaze with a rainbow of colors. I was drooling all over myself. When a 32 coup came by pearlescent orange I was jumping up and down. My brothers’ reaction was, “I would kill you first”. He is probably right, he wants me to go back with completely original, including the blue. I don’t care for the blue, and there are already four, so decisions, decisions. :?: :idea: :arrow:
Jonathan Baron
New member
Hey, I wasn't trashing Dave's color scheme! Just so long as he dumps the white in favor of Diana Cream :mrgreen:
NC74392
New member
Can't do the cream. Margaret would disown me and I still kinda like her after 24 years of marriage. That being said, there are ways to "warm" white a little :wink:
Already hate my interior (inferior) job. Sure wish I'd used Airtex and their expertise instead of a local... oh well- live and learn at the expense of sanity. That's what I get for trying to save a few bucks. I thought I'd be smart and buy the fabric from Airtex and have a local sew it. Saved me a grand total of $50. Wasn't worth it.
Here's what the guy did with my expensive vinyl:
CruisairPilot
New member
Dave,
I conversed with the late John Ward a couple years prior to his passing. He worked for Bellanca back in the early 1930's, left to pursue other ventures, and then returned to Bellanca after World War II. Amongst other duties, he was for a time the sales manager in his second tour with Bellanca. I asked him about the paint schemes used on the postwar planes. He told me that as the unsold planes stacked up at the factory after 1946, it was very much a buyer's market. Therefore, it was not uncommon for the planes to be repainted in whatever scheme the prospective customer wished, just so a sale could be closed and another plane moved off the inventory. I guess this explains why so many variations are seen in the old photos.
I think your paint scheme and colors look fine. From the photo, the interior looks sharp, too!
Regards,
Gary
NC74392
New member
Thanks Gary.
Chose Vinyl for several reasons, but paramount is the simple fact Margaret gets airsick (she still wants to go places) and it will be the easiest to clean. Besides- if it had been leather, the cats would have tracked/ clawed it up by now (4 cats- 2 dogs- no children).
Here's an older picture of my working space. If everything weren't on wheels, I don't know how I would manage it. As things stand, all I have to do is wheel stuff out of the way.
CruisairPilot
New member
Dave,
I know we're way off subject here so I'll keep it short. I built a Thorp T-18 in a garage maybe just a hair larger than yours. All my tools, work tables, etc., were on wheels so it could be moved to accommodate the space and activity. The T-18 project lasted 6 and a half years. It can be done. Keep up the faith and the good work!
Regards,
Gary
Jonathan Baron
New member
Sorry, Lynn, but poor Russell just keeps finding more evidence of criminal neglect or, more charitably, incompetence on my poor 'Master. As I noted, the annual expired before he could wrap up the hydraulics. As I've said, it's not that I've been cheap or short of attention and desire. I'm simply dealing with the probability that the only way you can own one is to know how to work on one. I've just been wondering lately if this ability is like the need for a hangar if you own a triple tail.
So...I make fun of color schemes, and await better days")
Jonathan
So...I make fun of color schemes, and await better days
Jonathan
NC74392
New member
Lynn:
Thanks for being a true inspiration for my own project. Sure hope you will post pictures (both on the ground and in flight) when you're done.
One word of caution- you may notice the metal brackets that attach the wing to the fuselage are a bit loose (you know- the ones attached through the wing spar- can't remember the technical name right now). If they are, they cannot be merely tightened. They must be shimmed. Reason? If you tighten without shimming, they will becone too narrrow to fit on the spar carry-through in the fuselage.
I'm probably preaching to the choir here, but I couldn't help mentioning it. It would have been just too frustrating to start mating the wings to the fuselage only to find you had to go back into the wing tank areas to loosen and shim the wing bolts.
Happy Landings my friend!
lwford
New member
Happy to report, the wing straps are tight as a drum. Wings are now ready for cover. we press on. Got a very nice note from Russell in regards to JB'S crate. Things are not so bad as assumed. Minor BS that will go away with tender loving care( MONEY) now on to the Tour. LYNN :mrgreen:
Jonathan Baron
New member
Indeed, Lynn, objectively speaking it appears that my crate is nearing flying condition thanks to Russell. Subjectively, however, when new things come up - even after the HUGE matters have been addressed - each one feels enormous. It's more a matter of sheer numbers than any single thing :roll:
Jonathan
Jonathan
Jonathan Baron
New member
Thanks for the encouraging words, DD. I initiated the TTT notion and have no keener desire than to be a part of it
Dan Cullman
New member
Dave, Are you saying your spar straps are loose? This is not a common problem. Usually, bolts through wood have more problems with overtightening. Remember, also, you are dealing with aluminum bolts. About a half turn past max finger tight. The fit on the fuselage is pretty close. Not a sloppy fit.
NC74392
New member
Dan-
Yes indeed. My straps are a wee bit loose due to wood shrinkage. One I should be able to tighten without shimming because there was a shim at the carry-through spar to strap connection. All I need to do is get out the ol' calipers and go at it one strap at a time- at least that's what I intend to do. If I need to proceed differently, let me know.
My e-mail is cruisair@hotmail.com
Apologies to Lynn for getting off-subject again
lwford
New member
Ok FYI how do you cover the Rudderlets ie: elephant ears on the Cruisemaster? I have asked lots of people this question and today we did it. Here is what I did. The ears have the tear drop( where it mounts to the stab) glued to the plywood surface so this creates a problem. You could cover the ear then cut out the fabric and cover the rest. This was my Plan B. Plan A : epoxy varnish the ear with 2 coats this has to cook off for 7 days, after the week apply two coats of PolyBrush this takes about 2 hours, let this dry to the touch. Now cut out one piece of Light fabric to cover the ear. Glue( Polytack) the edges of the fabric around the tear drop about 1/4 inch make sure it is tight against the tear drop on the base. When the Polytack dries shrink the tear drop up to 350 degrees. We now have the tear drop covered tight and wrinkle free with the remaining fabric loose all around the ear. Apply polybrush one coat to the tear drop. This sinks in and softens the two coats applied previously a very tight bond on the teardrop. After this dries here is the secret, now take the hobby iron and shrink the fabric an inch around the tear drop to remove any wrinkles( do not be concerned about the rest of the fabric). Lookin good now brush this one inch with a coat of Polybrush. This again sinks in and softens the bottom two coats making a real tight bond. Let this dry. Now after you have this teardrop finished and one inch perimeter finished, Polytack the edges of the ear trying to elimate as many wrinkles as you can by heat forming the edge, don't sweat wrinkles. Let the edges dry and now heat shrink the remaining fabric between the edge of the ear and the one inch margin DO NOT GO NEAR THE TEAR DROP AT THIS TEMP. The fabric will shrink and you will have just covered the ear in one piece. If you go to near the tear drop at 350 degrees a good chance the fabric will pull up from the edge and you will have to slit it with razor to lay it down. I learned this on my first attempt. When the ear is all shrunk up Polybrush the remaining fabric, this again sinks in and softens the 2 coats, The back side of the ear is a no brainer just do the edges and shrink then Polybrush, when this ear is all dried apply a two inch bias tape over the edge and Yippie all done. This took all day to do the two ears but worked out great. This made the wing covering look like it is going to be pretty simple compared to the rudderlets. Cy and Dan are right on when they say shrink and then seal not seal and try to shrink. This is a big job this covering and the way to attack it is one little job at a time! I press on Lynn N9818B the crate :mrgreen: